Urgent listings
Intended audience: recipient coordinator transplant program admin clinical services coord - csc csc manager
In emergency situations, the mandatory information normally required to place a recipient on the waitlist may not be available. An urgent listing skips mandatory fields and bypasses the referral, consult, and medical assessment phases to allow a rapid addition to the waitlist.
Use the Urgent listing options in the recipient profile and/or the organ referral(s) when a recipient’s medical condition requires immediate action.
Clinical Services Coordinators (CSCs) can complete an urgent listing on behalf of Recipient Coordinators, if necessary.
Recipient Coordinators can enter the information that was bypassed at any time, even after the recipient has been added to a waitlist.
Pancreas Islet and VCA journeys are not eligible for urgent listing.
Urgent Listing: Recipient profile
Using Urgent Listing on a recipient profile
Register a recipient with minimal information.
Select Recipients from the main menu on the top of the page.
Once in the recipient list, select the Add New Recipient button.
-
In the Demographics > Registration Information section, select the Urgent Recipient checkbox.

-
Enter minimally required information:
-
Scroll to the Demographics > Personal Information section and enter:
First Name.
Last Name.
Date of Birth.
Sex.
-
Scroll to the General Clinical Information section and enter:
Blood Type (use Unknown if necessary).
RH Factor (use Unknown if necessary).
-
-
Select the Save Recipient button at the bottom of the page.
To cancel, select the return to previous page icon or browse to any other page without saving. Any unsaved information is discarded.
Potential duplicates: If any three of the First Name, Last Name, Date of Birth, and Blood Type match an existing recipient, the system displays a warning. It is recommended that the recipient coordinator listed in the warning be contacted to that the recipient profile does not already exist.
The system assigns the recipient a TGLN ID and logs the Registration Date and Time. At this point, transplant journeys can be initiated for the recipient.
Completing the recipient profile for an urgent listing
When the remaining profile information is available and time permits, enter the mandatory information that was omitted.
Go to the recipient’s profile, then select Profile > Demographics on the sidebar.
-
Scroll to the Personal Information section and enter:
Ethnicity.
Insurance Type.
Insurance Number.
Select Save Demographics.
-
Scroll to the Contact Information - Permanent Address section and enter:
Country.
Province (or State).
Street address.
City.
Postal Code.
Select Save Contact Information.
The system automatically removes the Urgent Recipient flag .
If available, enter non-mandatory recipient information:
HLA (provided by HLA labs)
Urgent listing: transplant journey
Using Urgent Listing to initiate a transplant journey
In urgent situations, a transplant journey can be initiated with minimal information.
Go to the recipient’s profile, then select Profile > Referrals and Transplants on the sidebar.
-
To initiate a new journey, select an organ from the Add Required Organ dropdown.
The system presents the Referral - Organ form in the main area of the page (where Organ is the name of the organ you selected).
-
Enter required information under Transplant Program Details.
Verify that the Transplant Program and Recipient Coordinator are accurate; if they are not, select the correct value from the dropdown.
Select the Urgent Listing checkbox.
-
Select the Proceed with Organ Referral button
To cancel, select the return to previous page icon or browse to any other page without saving. Any unsaved information is discarded.
The system creates a new Active Journey for this recipient. The system assumes the most inclusive donor acceptability criteria to maximize chances of finding a donor.
The urgent listing appears in the Urgent Listings panel on the dashboard.
At this point, the journey can be placed on the waitlist without referral, consultation, assessment decisions, or organ specific information (see below).
Using Urgent listing on an existing journey
As long as an organ journey is still in the Referral, Consultation, or Assessment phase (that is, it has not been waitlisted), it can be flagged as an urgent listing.
Go to the recipient’s profile, then select Organ > Referral on the sidebar.
-
Under Transplant Program Details, select the Urgent Listing checkbox.

-
Select the Save Referral Details button.
To cancel, select the return to previous page icon or browse to any other page without saving. Any unsaved information is discarded.
The urgent listing appears on a special panel on the dashboard.
At this point, you can waitlist the journey without entering referral, consultation, assessment, organ specific information, or donor acceptability criteria information.
Removing the urgent listing flag from a journey
As long as an organ journey is still in the Referral, Consultation, or Assessment phase (that is, it has not been waitlisted), you can remove the urgent listing flag.
Go to the recipient’s profile, then select Organ > Referral on the sidebar.
Under Transplant Program Details, deselect the Urgent Listing checkbox.
-
Select the Save Referral Details button.
To cancel, select the return to previous page icon or browse to any other page without saving. Any unsaved information is discarded.
The urgent listing flag is removed from the journey. The urgent listing is removed from the relevant dashboard panel. The normal business rules for entering journey data are reinstated.
Adding a recipient to the waitlist for urgent listing
For urgent listings, a recipient can be added to the waitlist directly, without entering a referral decision, organ specific information, consultation decision, medical assessment decision, donor acceptability criteria or HLA information.
Only CSC Managers can put an urgently listed kidney or pancreas on the waitlist. Recipient Coordinators must contact the Provincial Resources Center to request this action.
-
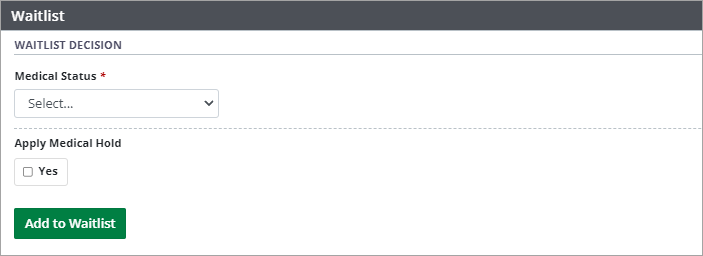
Go to the recipient’s profile, then select Organ > Waitlist on the sidebar (for the organ journey to be waitlisted).

-
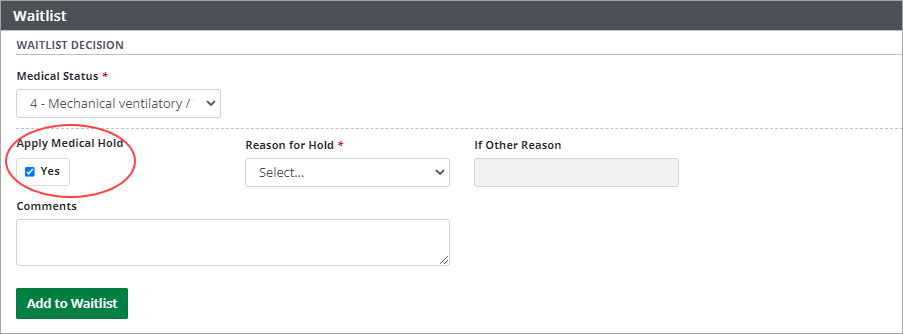
Select a Medical Status from the dropdown. For urgent listings, the Medical Status options are limited to high or critical statuses (see table below).

-
Optionally, select the Apply Medical Hold checkbox and provide a Reason for Hold.

-
Select the Add to Waitlist button.
To cancel, select the return to previous page icon or browse to any other page without saving. Any unsaved information is discarded.
The system presents a popup asking you to confirm that the recipient should be waitlisted.
-
Select:
OK to continue.
Cancel to return to the Waitlist Decision form.
The system adds the recipient to the organ waitlist and presents their medical status in the waitlist history table.
The recipient will be included in allocations when the requested organ becomes available, and will accrue wait time, subject to any medical holds.
The Urgent Listing indicator remains selected throughout the journey for statistical analysis, even if missing information is eventually added to the journey.
Business rules for medical holds and suspensions still apply (e.g., if HLA has not been provided, the journey is in a Serum hold). If a hold or suspension is triggered at time of waitlisting, it is shown in the waitlist history table.
Medical status options for urgent listings
Organ |
Medical status options for urgent listings |
|---|---|
Liver |
|
Heart |
|
Kidney |
|
Pancreas |
|
Lung |
|
Small Bowel |
|
