Initiate transplant journeys
Intended audience: recipient coordinator transplant program admin
Once the referral package has been received and reviewed and a recipient profile has been created, a transplant journey must be initiated. If the recipient was referred for more than one organ in the referral package, a transplant journey must be initiated separately for each organ and then linked to ensure they share a common Referral ID.
Enter journey information when:
You create the recipient’s profile, based on the recipient's referral package.
You obtain new information, at any time during the transplant journey.
In urgent cases, a referral package may not be available. A transplant journey can be initiated with a minimal amount of information.
Initiating a transplant journey
Initiate a transplant journey by completing referral information for an organ, based on information from the referral package.
-
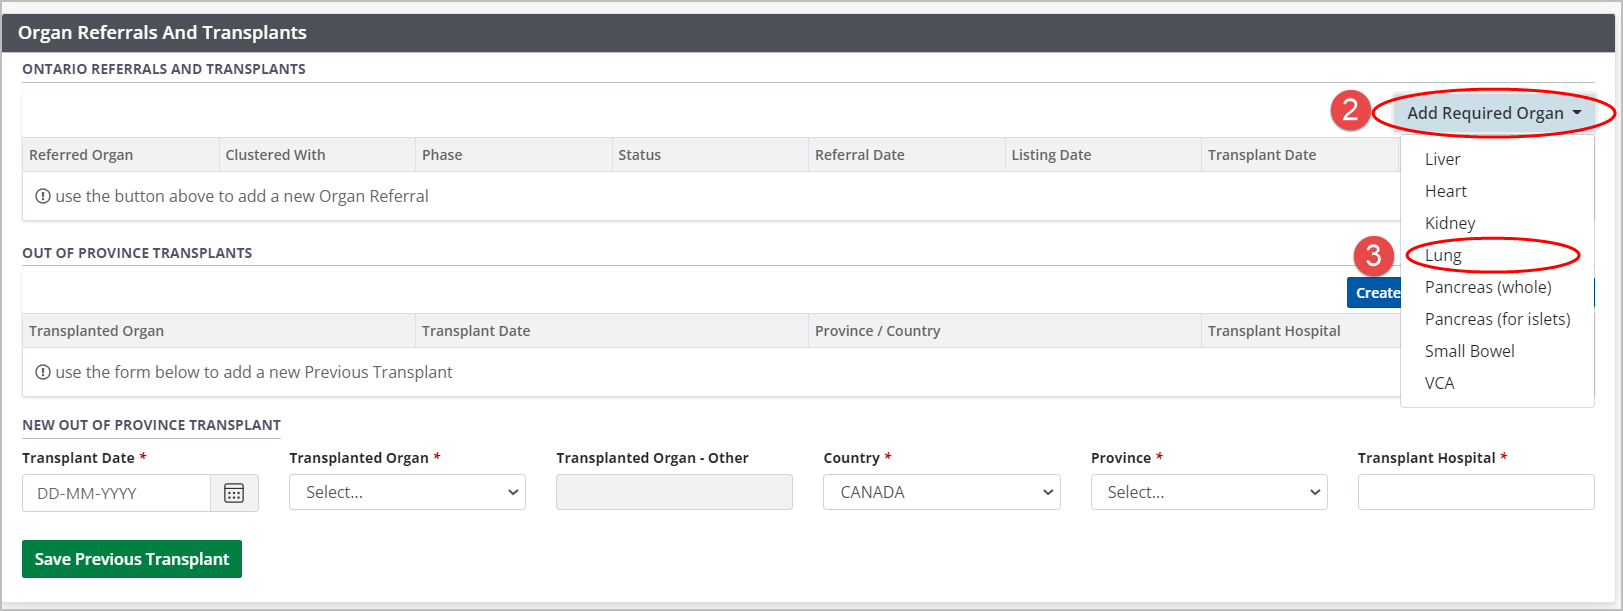
Go to the recipient’s profile, then select Profile > Referrals and Transplants on the sidebar.

A table at the top of the section presents all Ontario organ transplant journeys for this recipient. Currently, there are no journeys listed.
See also the Out of Province transplants help topic
To initiate a new journey, select an organ from the Add Required Organ dropdown. (The drop down list only shows the transplants your hospital performs.)
In the drop down, select the required organ type.
-
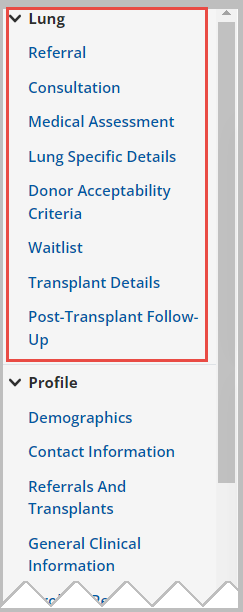
The system presents:
-
A new section on the sidebar that navigates through the organ journey.

-
A Referral - Organ section in the main area of the page (where Organ is the name of the organ you selected).

-
-
Enter required information under Transplant Program Details.
Verify that the Transplant Program and Recipient Coordinator are accurate; if they are not, select the correct value from the dropdowns.
If referral is considered an urgent listing, select the Urgent Listing field in order to bypass certain mandatory fields for this journey.
If the referral is for two (or more) organs, use the Referred With drop down (see details below).
-
Select the Proceed with Organ Referral button.
To cancel, select the return to previous page icon or browse to any other page without saving. Any unsaved information is discarded.
The system creates a new active journey for this recipient and generates a Referral ID for the journey.
You can see the active journey:
In the recipient’s summary (or summary bar) which shows the organ’s name and icon.
As a new row in the Ontario Referrals and Transplants table.
On the sidebar.
The system activates the rest of the Referral section so that referral details and referral decisions can be logged next.
Linking Referrals
In the case that there are two or more organs specified in one referral package (for example: heart and lung or kidney and pancreas), you link the two (or more) referrals under a common Referral ID number.
Prerequisite: referral details for one journey have already been saved.
Linking journeys is not the same as creating a Cluster for a multi-organ transplant. Linked journeys can be waitlisted separately or can be Clustered later on.
-
Either
Initiate a new journey with the Add Required Organ button or,
-
Select an existing journey from the Ontario Referrals and Transplants table.

-
Select the Referred With dropdown.
System presents a list of active journeys associated with the recipient.
If two or more journeys already share a Referral ID they will be presented as a single option with names concatenated (e.g., “Liver/Lung”).
Select the target journey(s) from the Referred With drop down.
-
Select:
Proceed with Organ Referral if adding and linking a new journey.
Save Referral Details updating and linking an existing journey.
-
System presents a confirmation prompt: “Your selection in the “Referred with” dropdown indicates that your program received a referral package for a {current organ} / {linked organ(s)} transplant. Do you wish to proceed?”
For example, if adding a Liver journey, and linking it to a “Kidney / Pancreas” journey in the message would read “… a referral package for a Liver / Kidney / Pancreas transplant.”
-
Select OK in the confirmation prompt.
To cancel, select Cancel.
The system updates the current journey to share the same Referral ID from the selected journey (even if the current journey already has a Referral ID.) General Comments from each journey are merged and are visible on all linked journeys.
When you update Referral Details and Referral Decisions you will be able to copy information between linked journeys.
Once journeys are linked, they cannot be unlinked in the system. To unlink journeys, please complete the OATS User Support Intake Form
