Manage general clinical information
Intended audience: recipient coordinator transplant program admin
General clinical information about a recipient includes blood type and body measurements. Clinical information is factored into the organ allocation and offer process when a donor organ becomes available.
Enter clinical information when:
You create the recipient’s profile, based on the recipient's referral package.
You obtain new clinical information, at any time during the transplant journey.
Adding or updating clinical data (blood type)
-
Go to the recipient’s profile, then select Profile > General Clinical Information on the sidebar.

The Clinical Data fields are populated with any previously saved information.
-
Add or edit information in the Clinical Data fields:
Select a Blood Type from the dropdown.
Select an RH Factor from the dropdown.
If the blood type and RH factor are confirmed, select Yes under Blood Type Verified.
-
Select the Save Clinical Data button (if visible) or scroll to the bottom of the page and select the Save Recipient button.
To cancel, select the return to previous page icon or browse to any other page without saving. Any unsaved information is discarded.
How Clinical Data affects the transplant journey:
Blood Type and RH Factor can be saved as Unknown but must be changed to valid values before a medical assessment decision of Recipient to be listed can be submitted.
The Blood Type Verified box must be selected before a medical assessment decision of Recipient to be listed can be submitted.
The Calculated Panel Reactive Antibody (cPRA) value is provided by the system, based on the recipient’s HLA results.
Adding measurements
Go to the recipient’s profile, then select Profile > General Clinical Information on the sidebar.
-
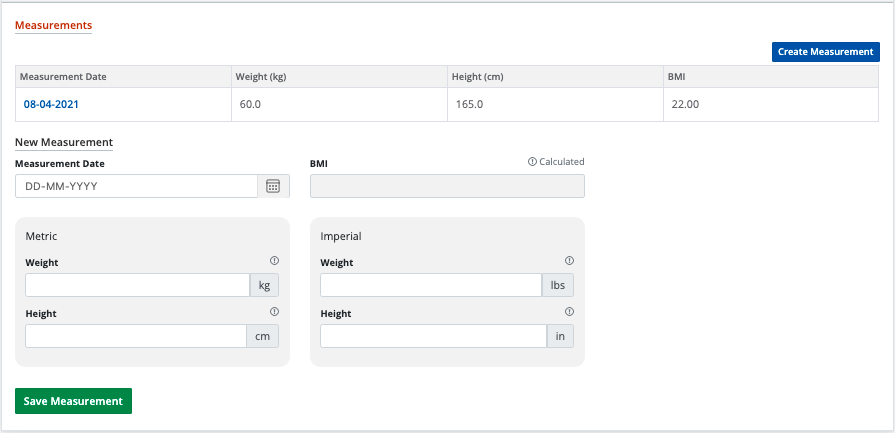
Scroll to the Measurements section.

Select the Create Measurement button.
-
Enter the date the measurements were taken, and the recipient’s height and weight, in the New Measurement fields.
-
Enter height and weight in either metric or imperial units. The system automatically calculates the alternate units as you work through the fields.

The system calculates BMI automatically.
-
-
Select the Save Measurement button (if visible) or scroll to the bottom of the page and select the Save Recipient button.
To cancel, select the return to previous page icon or browse to any other page without saving. Any unsaved information is discarded.
The system adds the new measurements to the Measurements table at the top of this section.
Viewing and editing historical measurements
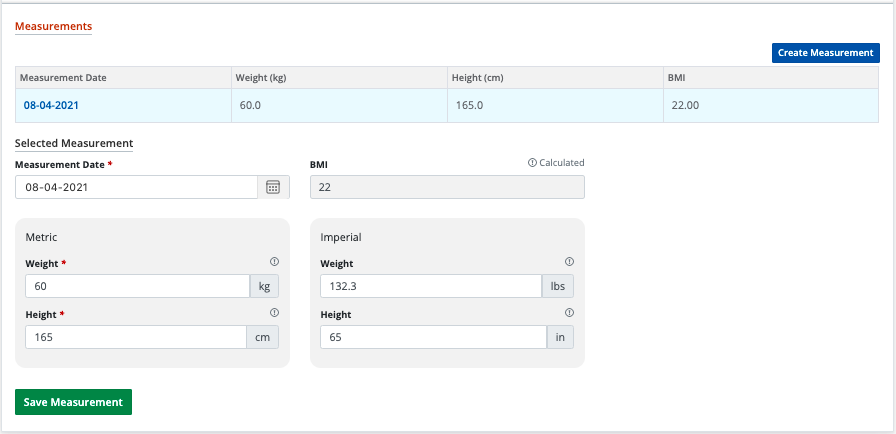
You can edit the details of the most recent set of measurements. All earlier measurements are locked and cannot be changed.
Go to the recipient’s profile, then select Profile > General Clinical Information on the sidebar.
-
Scroll to the Measurements section.

-
Select any measurement from the table of historical measurements to see details in the Measurement fields below.

If this is the most recent entry, edit the information as required. (Older entries cannot be changed.)
-
Select the Save Measurement button (if visible) or scroll to the bottom of the page and select the Save Recipient button.
To cancel, select the return to previous page icon or browse to any other page without saving. Any unsaved information is discarded.
The system updates the selected measurements.
