Manage organ clusters
Intended audience: recipient coordinator transplant program administrator clinical services coord - csc
If a recipient requires two or more organs to be transplanted simultaneously from the same deceased donor, the organs are grouped as an organ cluster. Typical clusters are Kidney/Pancreas and Liver/Small Bowel, but any two (or more) organs can be clustered on the system.
Creating a cluster
Prerequisite:
Two or more organ journeys must be wait listed or have a Medical Assessment Decision of To Be Listed.
User has permission to edit at least one of the organ types being clustered.
To join two organs as a cluster:
Go to the recipient profile and from the left navigation select one the organs to be clustered.
-
Navigate to the Waitlist area and scroll to the Cluster section.

In Clustered With, select the other organ to be clustered.
In Apply Donor Acceptability Criteria, choose the organ that has the most appropriate donor acceptability criteria for the recipient.
-
Select Save Cluster.
To cancel, select the return to previous page icon or browse to any other page without saving. Any unsaved information is discarded.
-
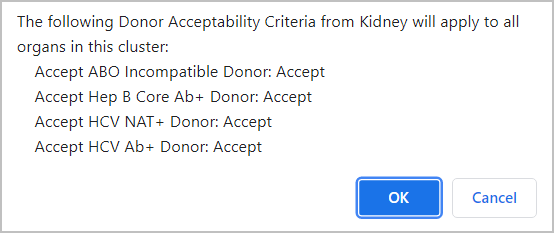
System presents a popup confirmation.
-
Take note of the specified Donor Acceptability Criteria selections that will be applied to the entire cluster. Any other Donor Acceptability Criteria that are not indicated in this popup must be managed separately within each organ journey before and after forming a cluster (for example, minimum and maximum donor Height, Weight, and Age acceptability).

-
-
Select:
OK to continue.
Cancel to return to the previous step.
The specified organs are joined as a cluster. The cluster will be considered in future allocations of the referred organs, and will accumulate wait time as a cluster.
The usual edits for the individual organs still apply when adding a cluster to the waitlist (for example, for Kidneys, the user must specify a preferred donor type, or for PAKs, there must be a completed kidney transplant on record).
The system completes several behind-the-scenes activities when adding a cluster, including applying holds and suspensions and adjusting wait time (for component organs on the waitlist). See Impact of clustering organ journeys for details.
Journeys within the cluster can still be updated individually, as new information becomes available to the transplant hospital (for example, to add dialysis events for kidneys or MELD test results for livers).
In the Recipient Profile > Referrals and Transplant section, the two journeys now show as clustered.

Adding an organ journey to a cluster
Prerequisite:
A cluster must have been created for two organ journeys.
Another organ journey must have a medical assessment of to be listed, or be on the waitlist.
To join a third (or subsequent) organ to a cluster:
Go to the recipient profile and from the left navigation, select the third (or subsequent) organ.
Navigate to the Waitlist.
-
Scroll down to the Cluster section.

In Clustered With, select the existing cluster (identified as organ 1/organ 2, for example, Liver/Pancreas).
In Apply Donor Acceptability Criteria, choose the organ or cluster that has most appropriate donor acceptability criteria.
-
Select Save Cluster.
To cancel, select the return to previous page icon or browse to any other page without saving. Any unsaved information is discarded.
-
System presents a popup confirmation.
-
Take note of the specified Donor Acceptability Criteria selections that will be applied to the entire cluster. Any other Donor Acceptability Criteria that are not indicated in this popup must be managed separately within each organ journey before and after forming a cluster (for example, minimum and maximum donor Height, Weight, and Age acceptability).

-
-
Select:
OK to continue.
Cancel to return to the previous step.
All specified organs are joined as a cluster. The cluster will be considered in future allocations of the requested organs and will accumulate wait time as a cluster until the transplant is complete.
The usual edits for the individual organs still apply when adding the cluster to the waitlist (for example, for Kidneys, the user must specify a preferred donor type, or for PAKs, there must be a completed kidney transplant on record).
The system completes several behind-the-scenes activities, for example: applies holds and suspensions and adjusts wait time. See Impact of clustering journeys for details.
In the Recipient Profile > Referrals and Transplant section, the journeys now show as not clustered.

Removing organs from a cluster
Prerequisite: a cluster must be established.
A cluster can be “broken” into individual journeys.
Go to the recipient profile and from the left navigation select one or the other of the organs and select Waitlist.
-
Scroll down to the Cluster section. The Clustered With field shows the clustered organs.

Select Uncluster.
-
System presents a popup confirmation.

-
Select:
OK to continue.
Cancel to return to the previous step.
-
If the cluster contains General Comments, another pop up reminder will appear.

-
Select:
OK to continue.
Cancel to return to the previous step.
All organs in the cluster become separate journeys. Each journey will be considered separately in future allocations and will accumulate wait time as an individual journey.
The system completes several behind-the-scenes activities, including adjusting wait time and applying holds and suspensions. See Impact of un-clustering a journey for details.
In the Recipient Profile > Referrals and Transplant section, the journeys now show as not clustered.

