Manage heart specific information
Intended audience: recipient coordinator transplant program admin
For recipients who require a heart transplant, enter heart-specific information in the system in four areas:
measurements,
hemodynamic information,
VAD/LVAD implants,
mechanical circulatory support and other comments.
This information is used to select and rank the recipient when a donated heart is allocated, and during the offer process, when transplant programs assess offers of a donated heart.
Enter heart specific information when:
Setting up the heart transplant journey, based on the recipient's referral package.
New information about the recipient’s heart becomes available (at any time during the transplant journey).
Heart measurements
Adding heart measurements
-
Go to the recipient’s profile, then select Heart > Heart Specific Details on the sidebar.
Heart Measurements is the first section under Heart Specific Details.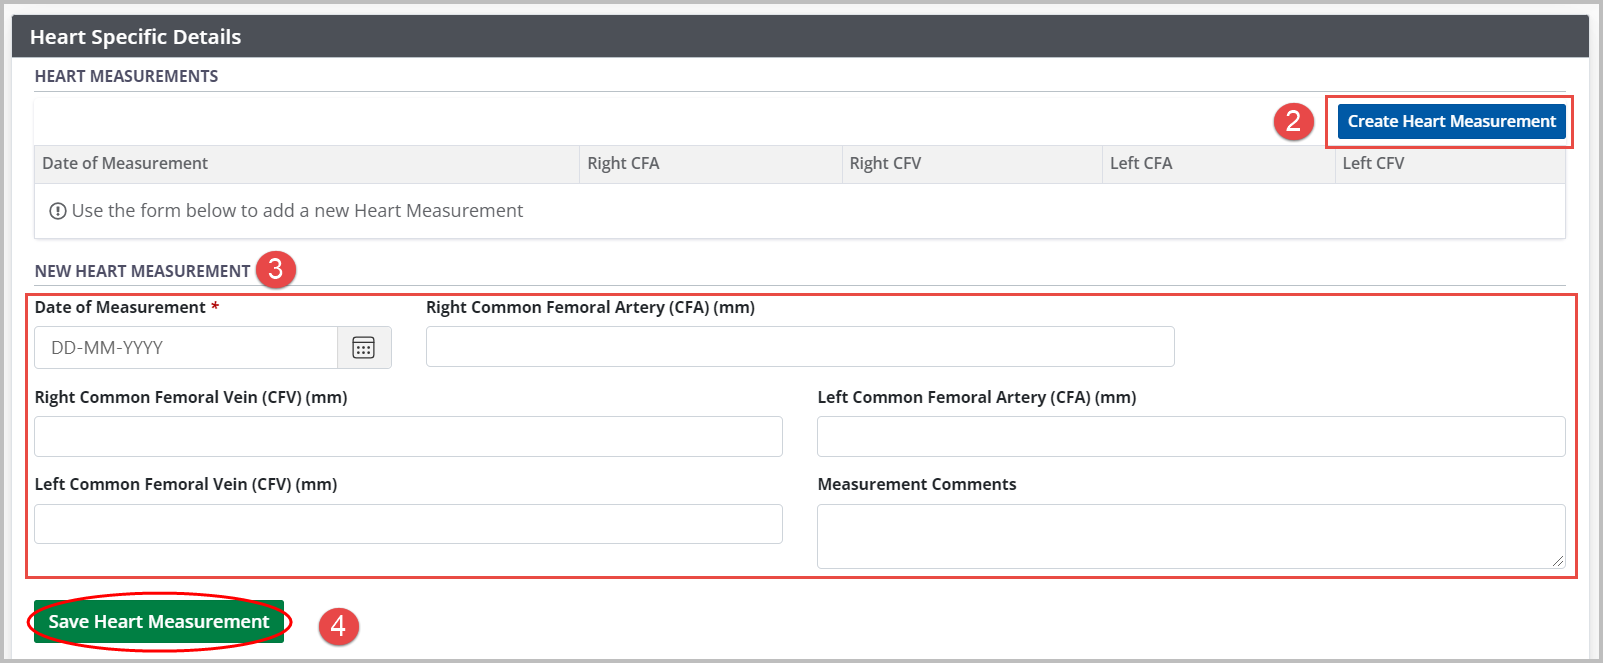
Select the Create Heart Measurement button.
Enter information in the New Heart Measurement fields.
-
Select the Save Heart Measurement button.
To cancel, select the return to previous page icon or browse to any other page without saving. Any unsaved information is discarded.
The system adds the new measurements to the Heart Measurements table at the top of this section.
Viewing and editing historical heart measurements
You can edit the most recent entry in the Heart Measurements table. Older entries are read-only.
-
Go to the recipient’s profile, then select Heart > Heart Specific Details on the sidebar.
Heart Measurements is the first section under Heart Specific Details.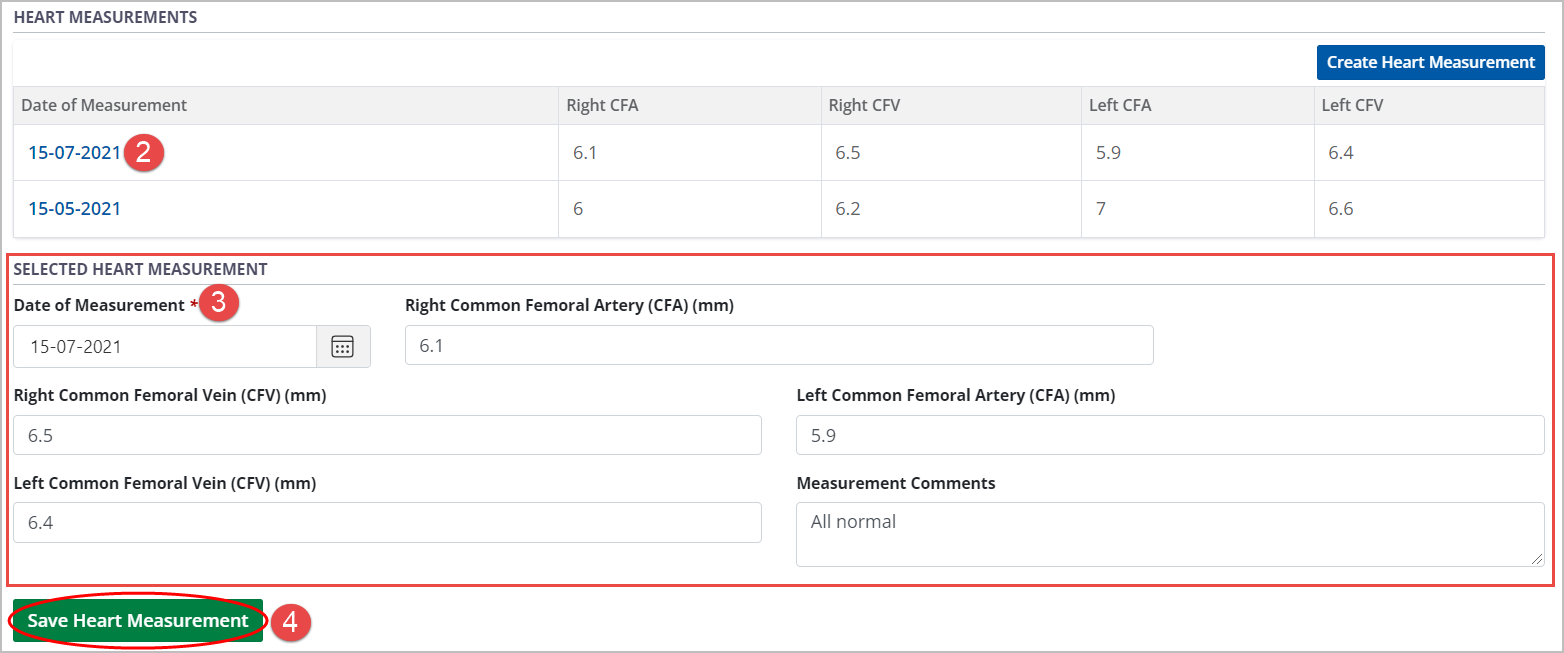
Select any entry from the table of historical heart measurements to see its details in the Selected Heart Measurement fields below.
Edit the information as required (for the most recent measurement only).
-
Select the Save Heart Measurement button.
To cancel, select the return to previous page icon or browse to any other page without saving. Any unsaved information is discarded.
The system updates the selected heart measurements.
Hemodynamic information
Adding hemodynamic information
Go to the recipient’s profile, then select Heart > Heart Specific Details on the sidebar and
-
Scroll to the Hemodynamic Information section.
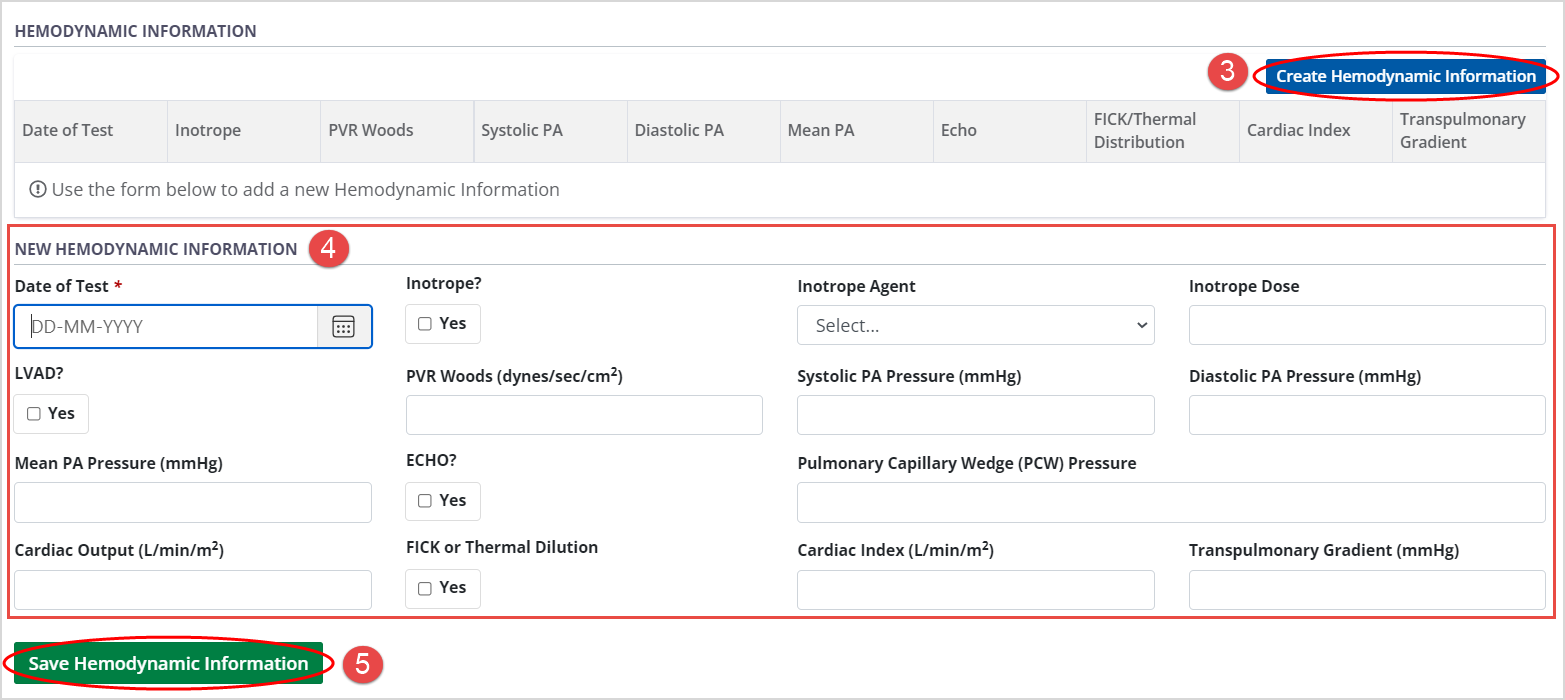
Select the Create Hemodynamic Information button.
Enter information in the New Hemodynamic Information fields.
-
Select the Save Hemodynamic Information button.
To cancel, select the return to previous page icon or browse to any other page without saving. Any unsaved information is discarded.
The system adds the new information to the Hemodynamic Information table at the top of this section.
Viewing and editing historical hemodynamic information
You can edit the most recent entry in the Hemodynamic Information table. All previous entries are read-only.
Go to the recipient’s profile, then select Heart > Heart Specific Details on the sidebar.
-
Scroll to the Hemodynamic Information section.
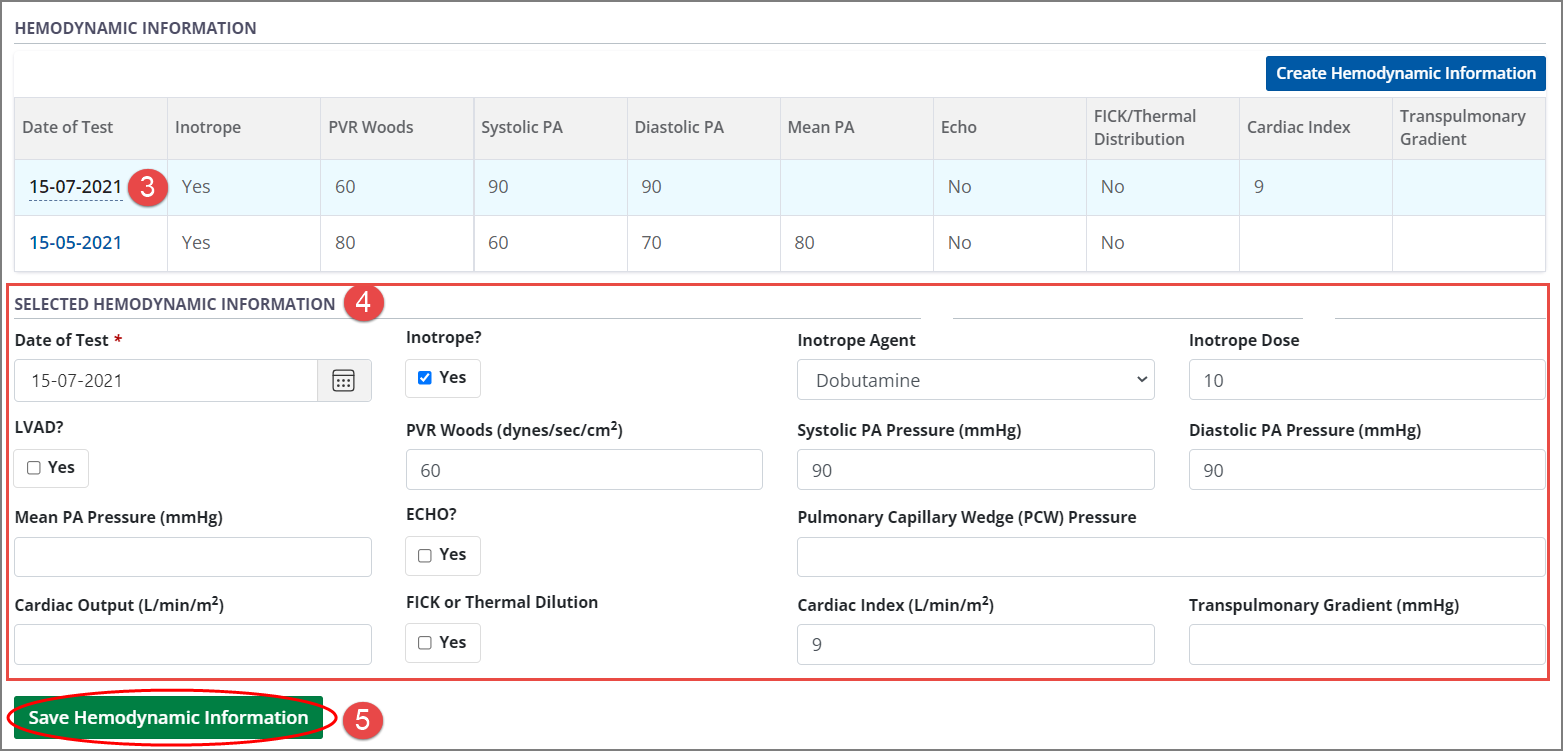
Select any entry from the table of historical hemodynamic information to see its details in the Selected Hemodynamic Information fields below.
If this is the most recent entry, edit the information as required.
-
Select the Save Hemodynamic Information button.
To cancel, select the return to previous page icon or browse to any other page without saving. Any unsaved information is discarded.
The system updates the selected entry.
Ventricular Assist Device (VAD)/LVAD implants
Some recipients require a VAD/LVAD implant at different stages of their life, and may undergo multiple surgeries to add or replace their implants.
A recipient may have two active VAD/LVAD implants, one per insert side (i.e., left and right); this is termed a BiVAD (see next section).
An implant is active if it does not have a discontinuation date associated with it.
BiVAD implants
When a recipient has active implants on both the left and right sides, and those implants have the same implant date, the system treats them as a BiVAD – edits to the Indication Date or Indication on one will automatically be applied to the other. Once one BiVAD implant is discontinued, automatic updating across left and right VAD entries ends.
VAD transfer requests
You will not be able to see VAD/LVAD details that have been entered by a different transplant program unless you request a VAD transfer.
How the VAD/LVAD indication affects the transplant journey:
-
Destination Therapy: recipient cannot be added to the waitlist, the journey remains open for updating.
If the recipient is on the waitlist at your hospital’s transplant program, they are removed from the waitlist with a reason of VAD for Destination Therapy.
If they are on the heart waitlist at a different transplant program their journey at that transplant program is not affected.
Bridge to Transplant: recipient’s heart journey continues, they may be added to the waitlist if they are not already on it.
Bridge to Candidacy: recipient is pending further assessment for transplant eligibility and might not be added to the waitlist immediately, but could be added later.
Bridge to Recovery: recipient’s heart journey is considered complete and is removed from waitlist.
Recording Ventricular Assist Device (VAD)/LVAD implants
Go to the recipient’s profile, then select Heart > Heart Specific Details on the sidebar.
-
Scroll to the VAD/LVAD Information section.
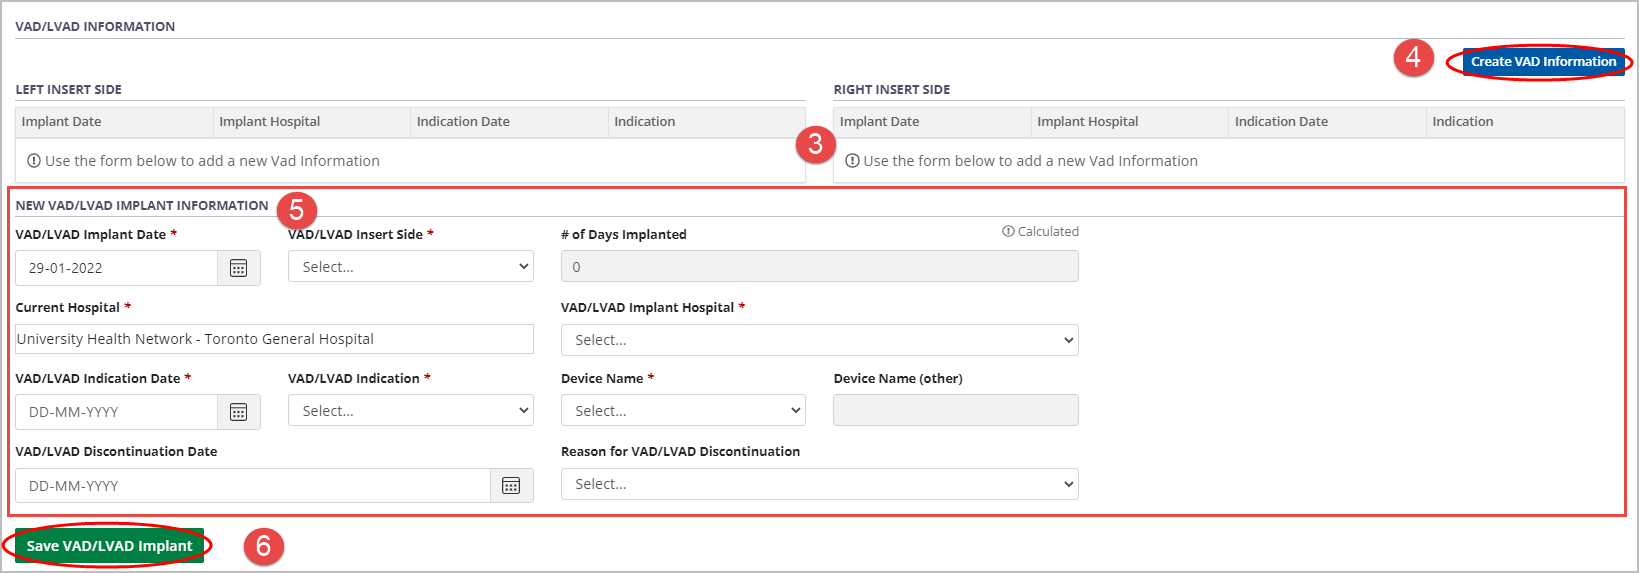
Left Insert Side and Right Insert Side tables at the top of this section present any historical VAD/LVAD information.
If the recipient’s profile contains VAD/LVAD implant information entered by a different hospital, the system presents a Request VAD Transfer button instead of the VAD/LVAD information.
Verify that any previous devices occupying the target side (either left or right) have been marked as Discontinued. You must update a previous device's Discontinuation Date before you enter details for a new VAD.
Select the Create VAD Information button.
Enter information in the New VAD/LVAD Implant Information fields.
-
Select the Save VAD/LVAD Implant button.
To cancel, select the return to previous page icon or browse to any other page without saving. Any unsaved information is discarded.
If the recipient is currently on the heart waitlist at your transplant program, and you selected a VAD/LVAD Indication of Destination Therapy, the system prompts you to confirm that the recipient will be removed from the heart waitlist.
-
Select:
OK to continue.
Cancel to edit.
The system adds the new information to the Left Insert Side or Right Insert Side table at the top of this section.
Viewing and editing historical VAD/LVAD information
You can edit indication and discontinuation information for the most recent entry in each of the VAD/LVAD Information tables (Left Insert Side and Right Insert Side). All other fields are locked and all previous entries are read-only.
Go to the recipient’s profile, then select Heart > Heart Specific Details on the sidebar.
-
Scroll to the VAD/LVAD Information section.
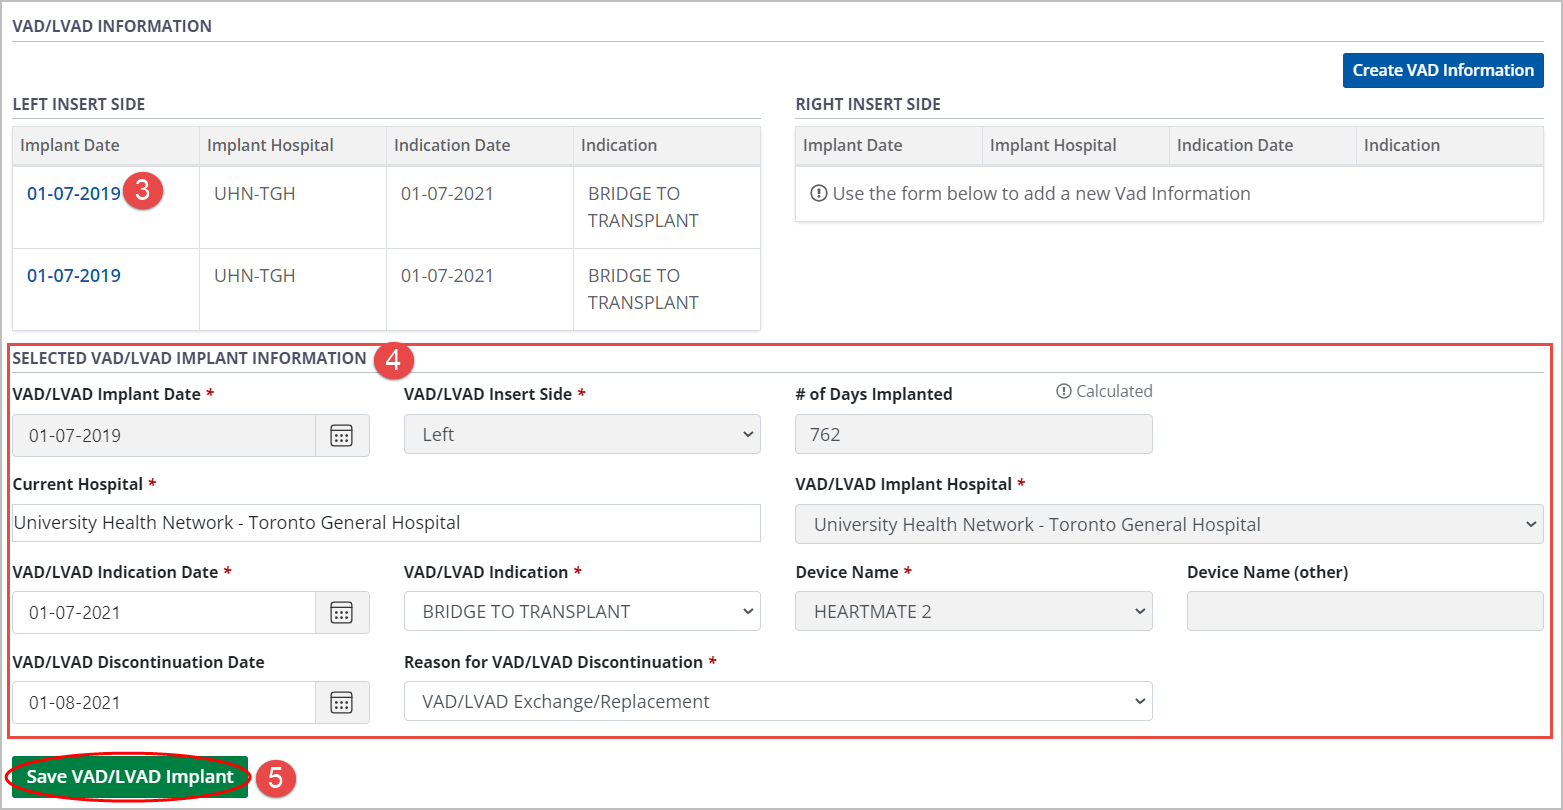
Left Insert Side and Right Insert Side tables at the top of this section present any historical VAD/LVAD information.
Select any entry from either table to see its details presented in the Selected VAD/LVAD Implant Information fields below.
-
If this is the most recent entry, edit the VAD/LVAD Indication, VAD/LVAD Indication Date, VAD/LVAD Discontinuation Date or Reason for VAD/LVAD Discontinuation as required.
-
For BiVAD implants (two active implants with the same implant date):
Edits to Indication Date or Indication on one BiVAD implant will automatically be applied to the other.
Edits to Discontinuation Date and Discontinuation Reason will not be applied to the other implant. When one implant is discontinued, the automatic updating across left and right VAD entries ends.
-
-
Select the Save VAD/LVAD Implant button.
To cancel, select the return to previous page icon or browse to any other page without saving. Any unsaved information is discarded.
The system updates the selected entry.
Adding or updating mechanical circulatory support and other heart details
Go to the recipient’s profile, then select Heart > Heart Specific Details on the sidebar.
-
Scroll to the Other Heart Details section.
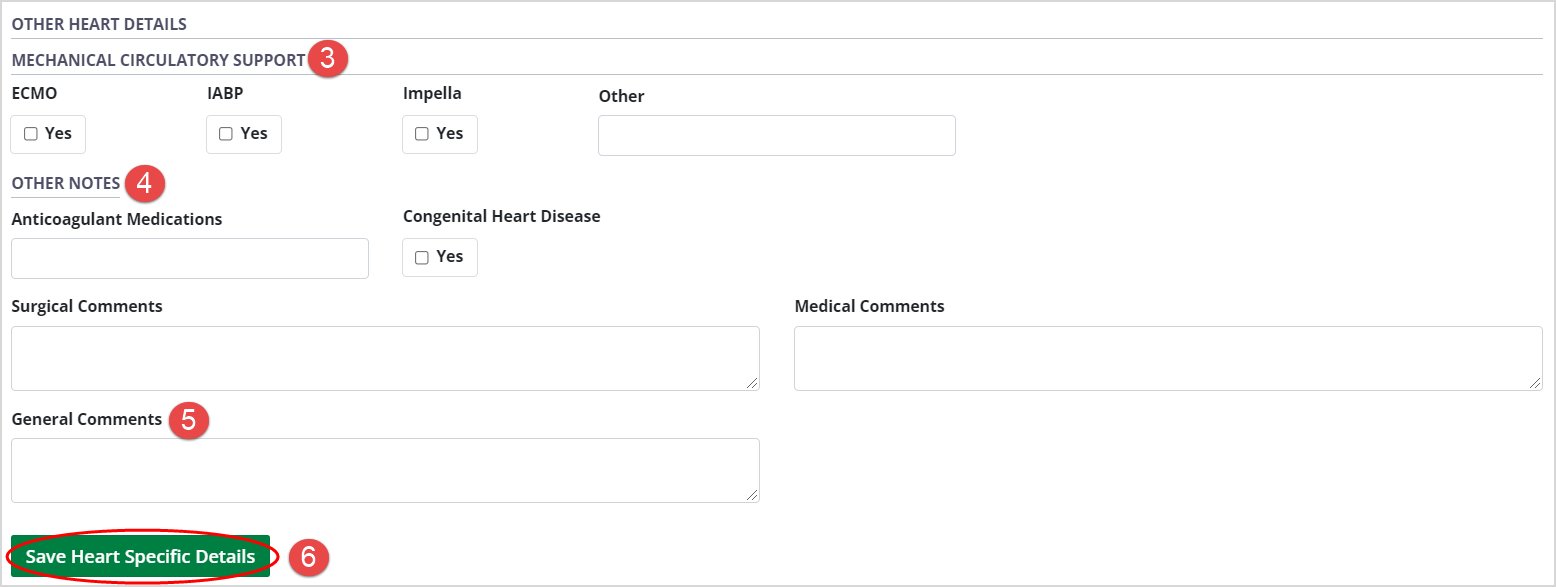
The fields are populated with any previously saved information.
Enter or edit information in the Mechanical Circulatory Support
Enter or edit other Notes fields, as needed.
-
Enter any general comments about the heart transplant journey in the General Comments field.
These comments appear in the Allocation Report and the Waitlist Report for transplant programs to view.
These comments will appear in any clustered journeys.
-
Select the Save Heart Specific Details button.
To cancel, select the return to previous page icon or browse to any other page without saving. Any unsaved information is discarded.
The system updates the recipient’s profile with the information you have entered.
