Manage kidney specific information
Intended audience: recipient coordinator transplant program admin
For recipients who require a kidney transplant, log kidney specific information in the system. This information is used to select and rank the recipient when a donated kidney is allocated.
Enter kidney specific information when:
Setting up the kidney transplant journey, based on the recipient's referral package.
New information about the recipient’s kidney tests and dialysis care become available (at any time during the transplant journey).
How kidney specific information affects the transplant journey:
To place a recipient on the waitlist, at least one dialysis event must be recorded, unless the recipient is paediatric or a Pre-Emptive Dialysis Exemption is applied.
If the kidney transplant is to follow another transplant (a staged kidney), the kidney transplant journey must be placed on hold until the prerequisite transplant has been done.
Adding or updating general kidney details
-
Go to the recipient’s profile and select Kidney > Kidney Specific Details on the sidebar.
General Kidney Details is the first section under Kidney Specific Details.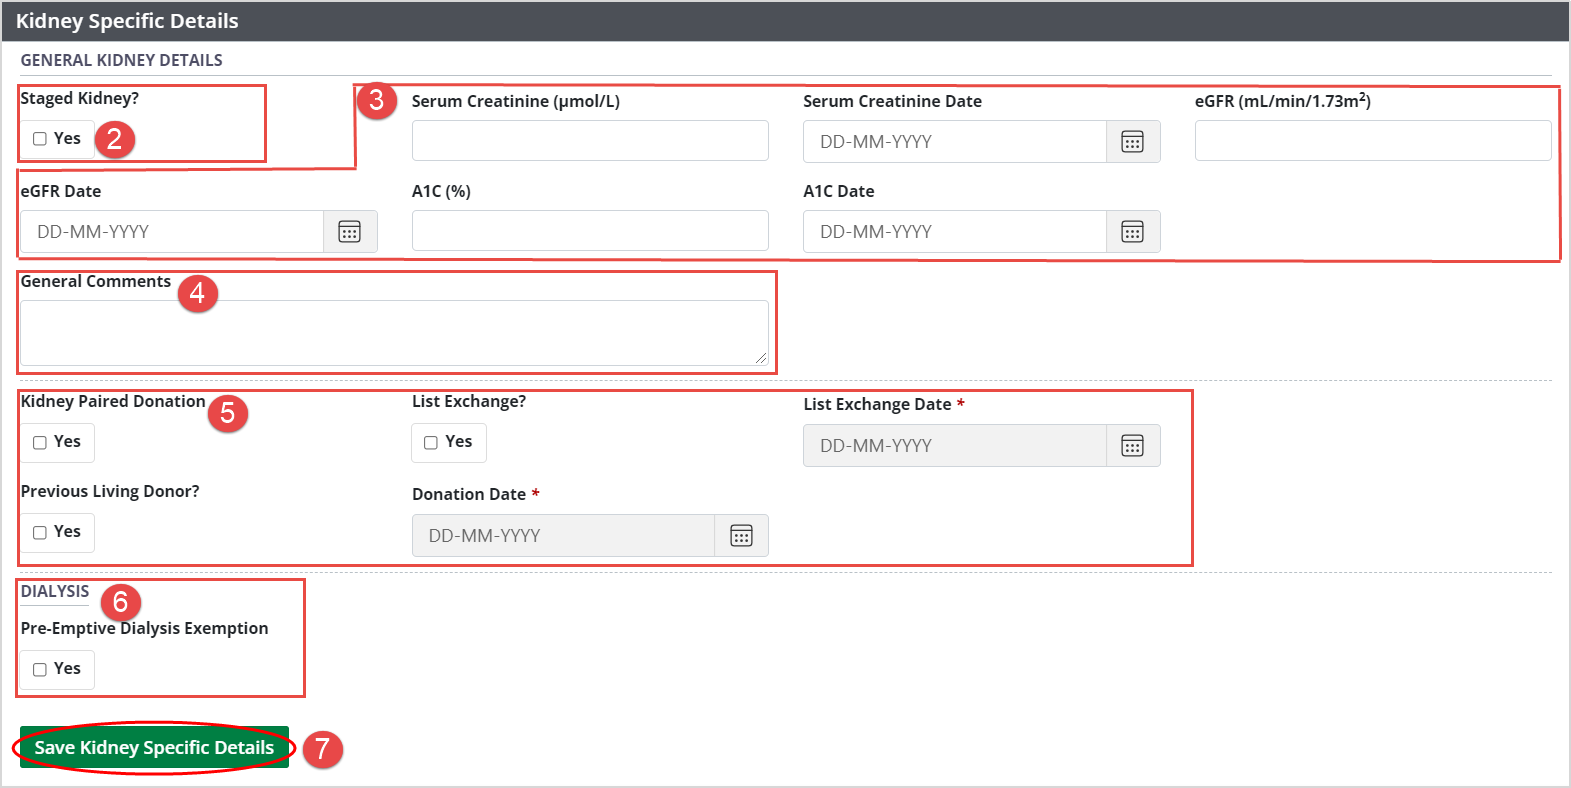
The fields are populated with any previously saved information.
If the kidney transplant is to follow another transplant, select Staged Kidney.
Enter or edit information in the General Kidney Details fields.
-
Enter any general comments about the kidney transplant journey in the General Comments field.
These comments appear in the Allocation Report and the Waitlist Report for transplant programs to view.
These comments will appear in any clustered journeys.
Indicate living donor options, if applicable: Kidney Paired Donation, List Exchange (and date), Previous Living Donor (and Date).
If the recipient recorded a GFR score of less than 15ml/min on two occasions, select Pre-Emptive Dialysis Exemption.
-
Select the Save Kidney Specific Details button.
To cancel, select the return to previous page icon or browse to any other page without saving. Any unsaved information is discarded.
Changing Staged Kidney status
If you change the Staged Kidney field (step 2 above), and this recipient is currently on the waitlist for a kidney you must adjust the recipient’s waitlist status.
Select Kidney > Waitlist on the sidebar.
-
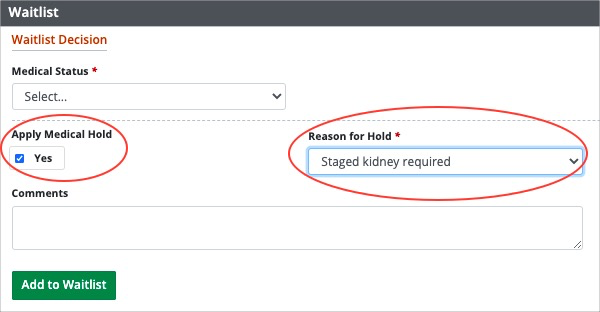
If you selected the Staged Kidney checkbox under General Kidney Details:
Select the Apply Medical Hold checkbox.
Select Staged kidney required from the Reason for Hold dropdown.
-
Add Comments as appropriate.
-
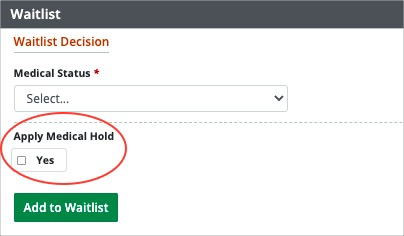
If you deselected the Staged Kidney checkbox under General Kidney Details,
-
deselect the Apply Medical Hold checkbox under Waitlist.
-
Select the Add to Waitlist button.
If Staged Kidney is selected, the recipient’s journey is effectively paused.
If the recipient is not currently on the waitlist, they will automatically be placed on hold when waitlisted.
If the recipient is Active on the waitlist and you select Staged Kidney, you must go to the waitlist and apply a medical hold to this recipient.
Deselecting Staged Kidney allows the journey to resume.
If the recipient is Inactive on the waitlist and you deselect Staged Kidney, you must go to the waitlist and remove the medical hold.
Exempting recipient from dialysis reporting
Normally, to place a recipient on the waitlist, at least one dialysis event must be recorded, unless:
The recipient is paediatric (the recipient is under 19 years of age, or
a paediatric age override has been applied to the journey), or
The Pre-Emptive Dialysis Exemption box is checked.
You can exempt a recipient from having to report dialysis events, if the recipient has recorded a GFR score of less than 15 ml/min on two occasions:
Go to the recipient’s profile, then select Kidney > Kidney Specific Details on the sidebar.
Scroll to the Dialysis section.
Select Yes under Pre-Emptive Dialysis Exemption.
Select the Save Kidney Specific Details button.
The system saves the exemption.
The recipient may be added to the waitlist without dialysis events if the “Pre-Emptive Dialysis Exemption” is applied. When the user selects the ‘Pre-emptive Dialysis Exemption’ checkbox and if the recipient already has an eligible Dialysis event captured OR when the user inputs the Dialysis details and saves with an existing ‘Pre-emptive’ selection, the system must display a pop-up error message to indicate that the user cannot identify this recipient as a ‘Pre-emptive candidate’ with a dialysis event.
Adding a dialysis event
To add a new dialysis event to the recipient’s profile:
Select Kidney > Kidney Specific Details on the sidebar
-
Scroll to the Dialysis Events section.
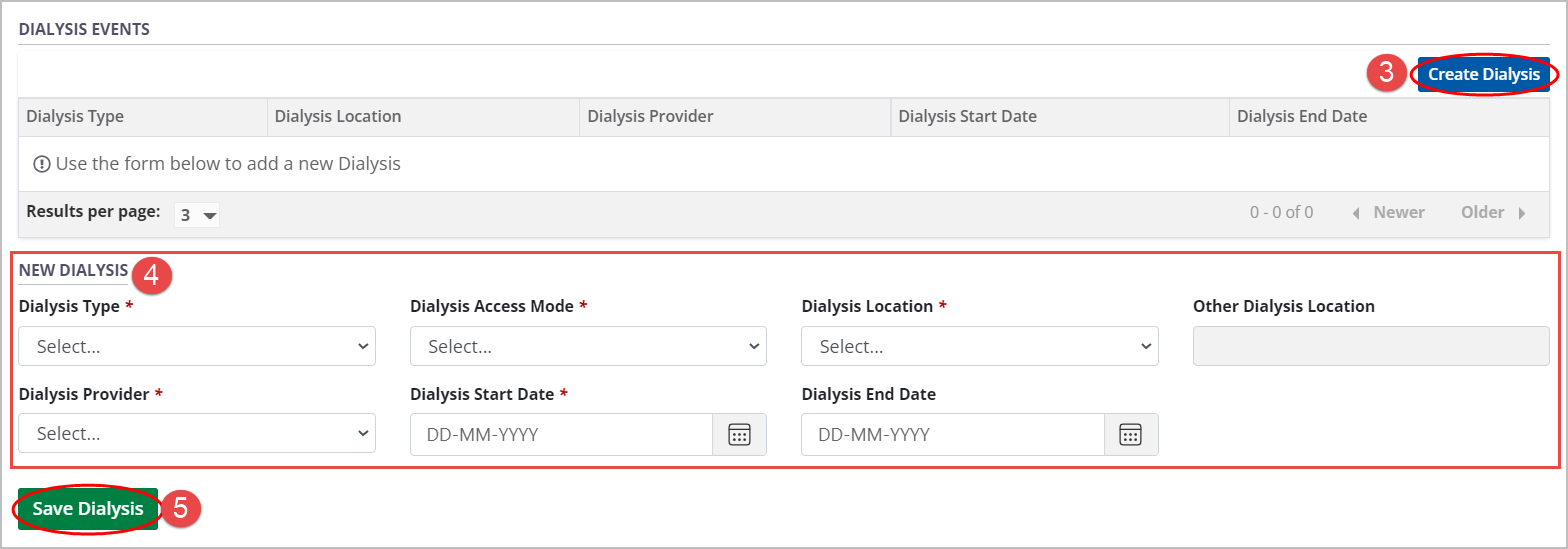
Select the Create Dialysis button.
-
Enter dialysis details in the New Dialysis Event fields.
Dialysis events can be saved without an end date.
Dialysis end dates cannot be in the future.
-
Select the Save Dialysis Event button.
To cancel, select the return to previous page icon or browse to any other page without saving. Any unsaved information is discarded.
The system adds the new event to the Dialysis Events table.
The recipient can be waitlisted.
Viewing and editing historical dialysis events
For the most recent entry in the Dialysis Events table, every field can be edited.
For all earlier entries, only the Dialysis End Date can be edited.
Go to the recipient’s profile, then select Kidney > Kidney Specific Details on the sidebar.
-
Scroll to the Dialysis Events section.
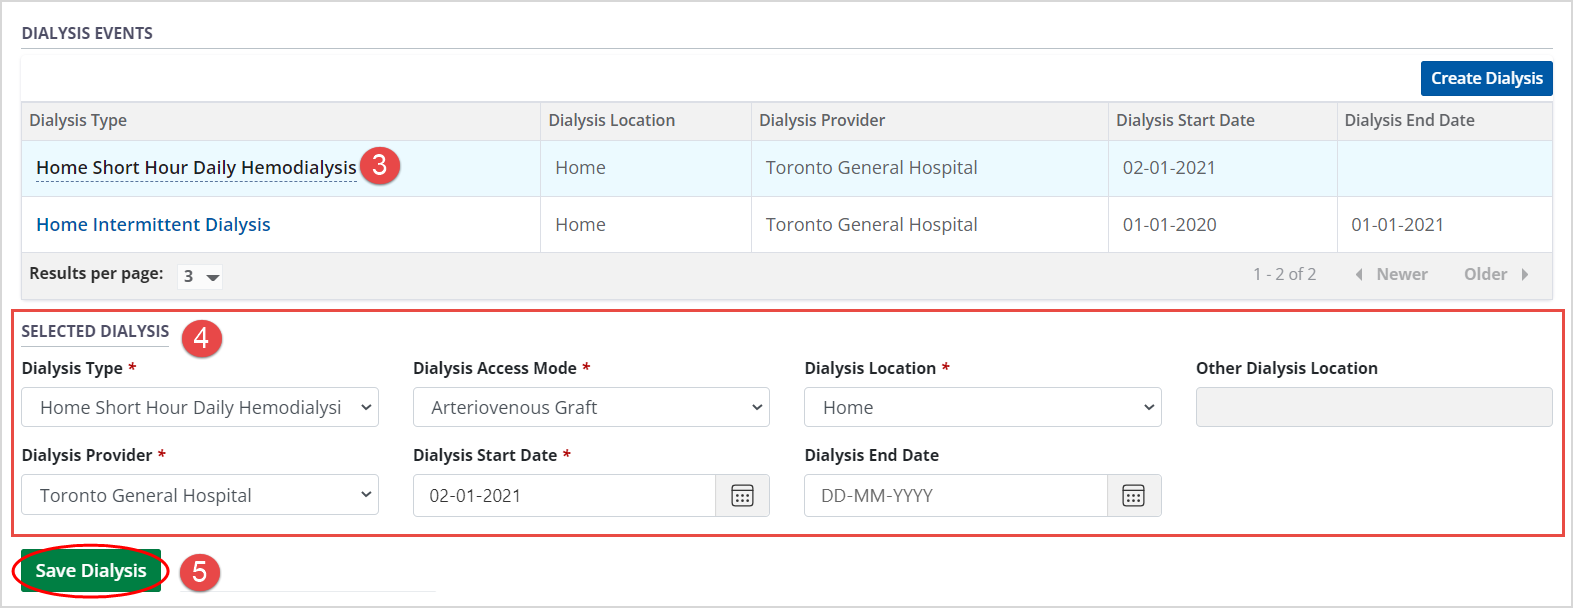
Select any entry from the table of historical dialysis events to see its details in the Selected Dialysis fields.
-
Edit the selected entry (if required):
If this is the most recent entry, edit any field.
-
If this is not the most recent entry, edit the Dialysis End Date.
Dialysis end dates cannot be in the future.
-
Select the Save Dialysis button.
To cancel, select the return to previous page icon or browse to any other page without saving. Any unsaved information is discarded.
The system updates the selected dialysis event.
Viewing paediatric age overrides
In some cases, an adult kidney recipient may be treated as a paediatric recipient for clinical reasons. An authorized Special Case Committee (SCC) administrator can update the recipient’s journey to indicate that they should be treated as a paediatric patient until a specified date.
If a paediatric age override is currently applied to a recipient, a Paediatric Age Override section is visible under Kidney Specific Details.
Go to the recipient’s profile, then select Kidney > Kidney Specific Details on the sidebar.
-
Scroll to the Paediatric Age Override section.

-
This section displays the following information:
Override start date – the date this override begin
Override end date – the date this override end
Comments
Viewing Wait time overrides
The system or the Special Case Committee can change a kidney transplant journey’s wait time on the waitlist, to enhance the recipient’s ranking in kidney allocations.
If a transplanted kidney fails within 90 days of surgery, the system automatically applies wait time to a follow up surgery.
If a transplanted kidney fails after 90 days of surgery, the SCC can, on appeal, apply wait time to a follow up surgery.
On appeal, the SCC can elevate a recipient's medical status to High.
If any of these overrides are applied to a kidney journey, Wait Time Overrides are visible in the journey’s Waitlist section.
This Wait Time Override includes the following information:
A table of all historical overrides for this journey.
-
For each override:
Date
Reason for override
Override days – the number of days added to, or subtracted from, the wait time
Comments

