Remove a recipient from a waitlist
Intended audience: recipient coordinator transplant program admin
A recipient can be manually removed from a waitlist if their transplant journey comes to an end. Reasons to do so include: recipient choice, changes in medical eligibility, transfer to another province, or other factors affecting a recipient’s eligibility for organ allocation.
Users can remove a journey from the waitlist using the system.
The system automatically removes a recipient from associated waitlists in the event of:
Transplant Completion.
Indication the VAD has been implanted “for destination” (i.e., instead of a transplant).
Patient Death.
Once a journey has been removed from the waitlist it cannot be added to the waitlist again.
If a journey belongs to a cluster, removing it from the waitlist will remove all journeys in the cluster.
Removing a single journey from a waitlist
Go to the recipient’s profile, then select Organ > Waitlist (where Organ is the transplant journey you want to remove).
-
Scroll to the Remove from Waitlist section.

-
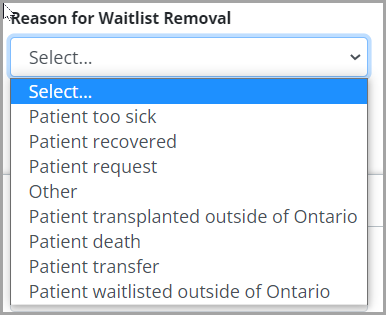
Select a Reason for Waitlist Removal.
-
Provide additional details if you select a removal reason of Other.

-
Select the Remove from Waitlist button.
-
The system presents a confirmation pop up.

-
Select
OK to remove the recipient from the waitlist.
Cancel to abandon the action.
The system removes the journey from the waitlist and the recipient will no longer be included in allocations or wait time calculations.
The system:
End dates any Medical Hold, Serum Hold, or Suspension on the waitlist.
Sends an update of the status to the Canadian Transplant Registry (CTR).
Shows the journey as cancelled in the recipient’s summary bar.
Locks all other sections of the recipient’s profile.

Regarding Reason for Withdrawal of Patient Death. If you have complete information about the patient’s death, you are encouraged to register the death as a recipient outcome, rather than removing the journey from the waitlist directly.
Removing a cluster of journeys from the waitlist
Removing a clustered journey from the waitlist will automatically remove all journeys in that cluster.
Go to the recipient’s profile, then select Organ > Waitlist (where Organ is one of the organ transplant journeys in the cluster).
-
Scroll to the Remove from Waitlist section.

-
Select a Reason for Waitlist Removal.
-
Provide additional details if you select a removal reason of Other.

-
Select the Remove from Waitlist button.
-
System presents a confirmation popup.

-
Select:
OK to remove all clustered journeys from their respective waitlists.
Cancel to abandon the action.
The system removes the all the clustered journeys from the waitlist and recipients will no longer be included in allocations or wait time calculations.
The system:
Shows the component journeys as cancelled in the recipient’s summary bar.
Removes the recipient from the waitlist for all component journeys.
Locks all other sections of the recipient’s profile.
Removing a single journey from a waitlist when it belongs to a cluster
To remove a single journey from a waitlist when it belongs to a cluster, break the cluster first (as outlined in Manage organ clusters) then follow the steps for removing a single journey.
