Manage HCC tests and therapies
Intended audience: recipient coordinator transplant program admin
HCC test results
If a recipient has hepatocellular carcinoma, enter HCC test results to determine if the recipient is eligible for HCC exception points.
How HCC affects the transplant journey:
-
When HCC is In Criteria:
At least one HCC data entry must be provided.
The system calculates an HCC score and applies it to the Allocation score.
If the HCC data has expired, and the journey is waitlisted, the journey is suspended until current HCC data is entered.
-
When HCC is Out of Criteria:
If HCC test results are added, the system calculates an HCC score but the score is not applied to the Allocation score.
If no HCC test results are added, no scores are calculated.
The presence of HCC information for a In Criteria recipient is sufficient to add the recipient to the waitlist. However, if HCC data has expired, an HCC suspension will be applied.
Selecting HCC criteria
Go to the recipient’s profile, then select Liver > Liver Specific Details on the sidebar.
Scroll to the HCC section.

Under HCC Criteria, select HCC Out of Criteria or HCC In Criteria.
If the recipient’s HCC is in criteria, make sure at least one HCC test result has been saved in the section below. You cannot save HCC In Criteria if there are no HCC test results for this journey.
Select the Save HCC Criteria button.
Adding HCC results
Go to the recipient’s profile, then select Liver > Liver Specific Details on the sidebar.
Scroll to the HCC section.

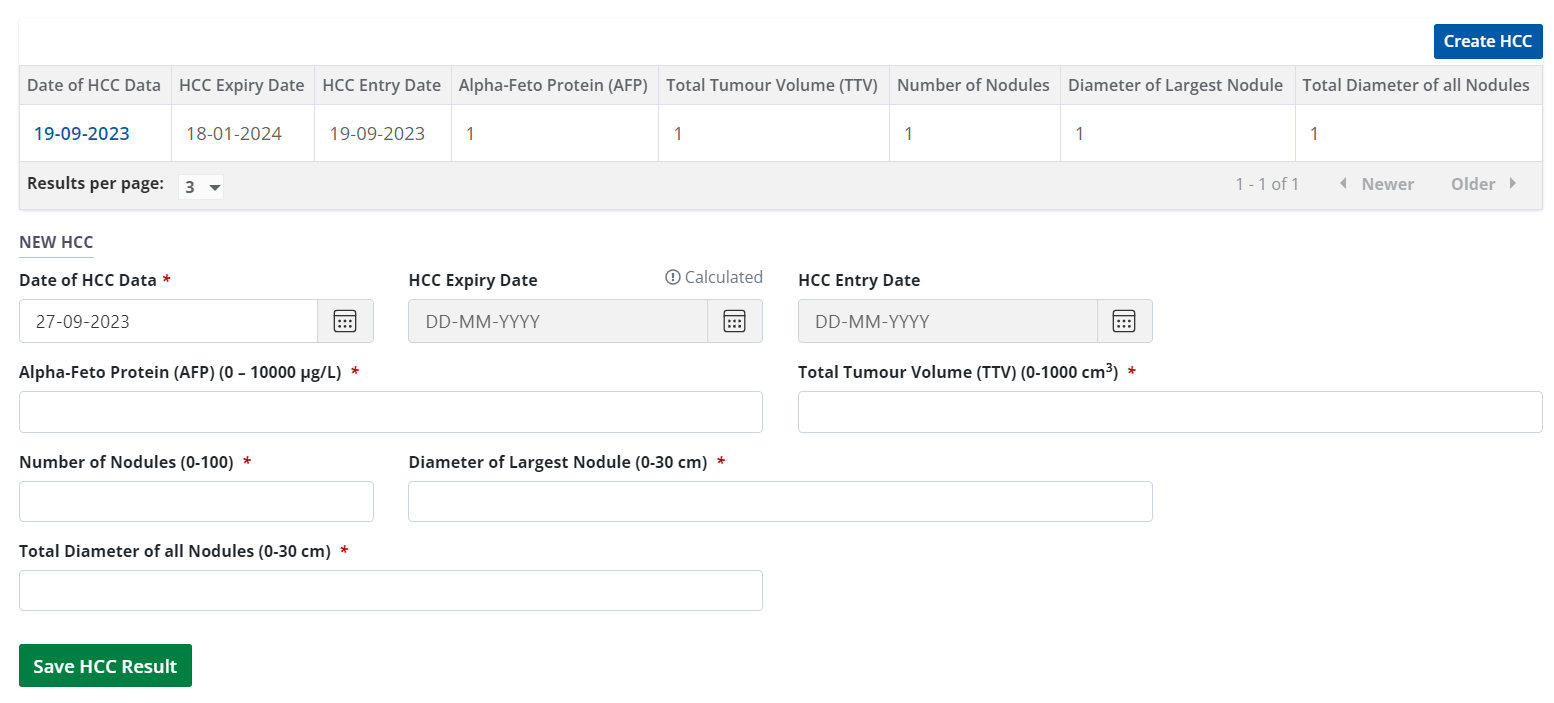
Select the Create HCC button.
Enter information in the New HCC fields.
-
Select the Save HCC Result button.
To cancel, select the return to previous page icon or browse to any other page without saving. Any unsaved information is discarded.
While the system indicates an expected range of normal values (e.g. Total Diameter of all Nodules (0-30 cm)), you may enter information that is outside of these ranges if appropriate. The system presents a warning which can be dismissed.
When a user saves HCC data the system will display a pop-up reminder

The system calculates an HCC score based on the test result.
The test result is added to the HCC table.
The system also recalculates the Allocation Score based on the new HCC score and adds a row to the Allocation Score history table. If HCC In Criteria is selected, the new score will be used in subsequent liver allocations.
Viewing and editing historical HCC results
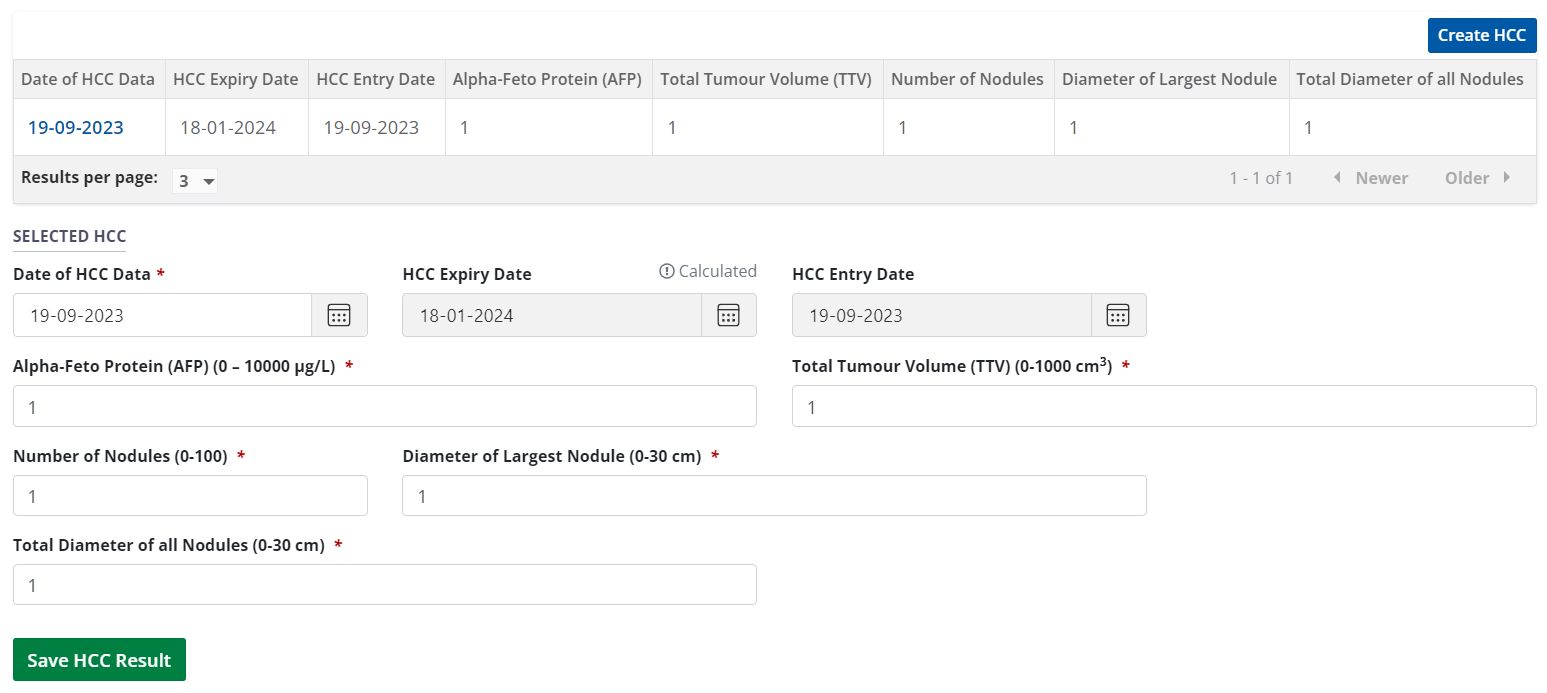
You can edit the most recent entry in the HCC table. All previous entries are read-only.
Go to the recipient’s profile, then select Liver > Liver Specific Details on the sidebar.
Scroll to the HCC section.

Select any row from the table of historical test results to see its details in the Selected HCC fields.
If this is the most recent entry, edit the information as required.
-
Select the Save HCC Result button.
To cancel, select the return to previous page icon or browse to any other page without saving. Any unsaved information is discarded.
When a user saves an initial selection of “HCC In Criteria” and the recipient’s most recent HCC lab is expired, the system will display a pop-up confirmation prompt with "OK" and "Cancel" options.

The system calculates an HCC score based on the updated test result.
The test result is updated in the HCC table.
The system also recalculates the Allocation Score based on the new HCC score and adds a row to the Allocation Score history table. The new score will be used in subsequent liver allocations.
HCC therapies
If the recipient is receiving treatment for their HCC, enter information about their Bridging or Downstaging therapies.
Adding bridging therapy information
Go to the recipient’s profile, then select Liver > Liver Specific Details on the sidebar.
-
Scroll to the Bridging Therapy section.

Select the Create Bridging Therapy button.
Enter information in the New Bridging Therapy fields.
-
Select the Save Bridging Therapy button.
To cancel, select the return to previous page icon or browse to any other page without saving. Any unsaved information is discarded.
The system adds the new bridging therapy information to the bridging therapy table.
Viewing and editing historical bridging therapy information
You can edit the most recent entry in the Bridging Therapy table. All previous entries are read-only.
Go to the recipient’s profile, then select Liver > Liver Specific Details on the sidebar.
-
Scroll to the Bridging Therapy section.

Select any entry from the table to see its details in the Selected Bridging Therapy fields.
If this is the most recent entry, edit the information as required.
-
Select the Save Bridging Therapy button.
To cancel, select the return to previous page icon or browse to any other page without saving. Any unsaved information is discarded.
The system updates this entry in the bridging therapy table.
Adding downstaging therapy information
Go to the recipient’s profile, then select Liver > Liver Specific Details on the sidebar.
-
Scroll to the Downstaging Therapy section.

Select the Create Downstaging Therapy button.
Enter information in the New Downstaging Therapy fields.
-
Select the Save Downstaging Therapy button.
To cancel, select the return to previous page icon or browse to any other page without saving. Any unsaved information is discarded.
The system adds the new downstaging therapy information to the downstaging therapy table.
Viewing and editing historical downstaging therapy information
You can edit the most recent entry in the Downstaging Therapy table. All previous entries are read-only.
Go to the recipient’s profile, then select Liver > Liver Specific Details on the sidebar.
-
Scroll to the Downstaging Therapy section.

Select any entry from the table to see its details in the Selected Downstaging Therapy fields.
If this is the most recent entry, edit the information as required.
-
Select the Save Downstaging Therapy button.
To cancel, select the return to previous page icon or browse to any other page without saving. Any unsaved information is discarded.
The system updates this entry in the downstaging therapy table.
